Category Archives: Austin

A Neighborhood Walk with the Olympus OM-D E-M5 Camera

On May 1st, I went down to Precision Camera here in Austin and ordered one of the new Olympus OM-D E-M5 Micro Four-Thirds cameras (in silver and black) with the 12-50mm f/3.5-6.3 “kit” lens. I also ordered 3 prime lenses to round out the system. They were the Olympus 25mm f/1.4, the Panasonic Leica 25mm f/1.4, and the Olympus 45mm f/1.8 lenses.

Since the Micro Four-Thirds cameras have a 2x sensor magnification from that of a full-frame 35mm camera, the 12-50mm kit lens would be the equivalent of a 24-100mm lens on a full-frame 35mm camera. The 3 prime lenses would perform like 24m, 50mm, and 90mm equivalents.

On Wednesday May 23rd, everything came in, except for the Panasonic Leica 25mm f/1.4 lens. We were leaving for a week of vacation on Sunday May 27th, and I had pretty much come to grips that we would be taking the old Canon camera 5D Mk II on this week long trip to Ruidoso, New Mexico.

By getting a brand new camera “system” just days before a week-long vacation didn’t give me much time to learn how to use it – but I was going to “learn it as I went”. On Saturday morning, less than 24 hours before we were going to leave, I decided that I would take my new camera with me on my usual Neighborhood Walk. I’ve been walking this same route up to 4 times a week for over 11 years now, and I had never taken a camera with me before. The journey always starts right here at my front door.

Helpful Hint: You can always view any photo at a larger size by just clicking on it. You will then need to use your browser’s “Back Button” to return to my story.

I was in my walking shoes and shorts, and I was planning on getting somewhat sweaty, so there was no way I was going to bring along a camera bag. No, I was going to have to travel light – really light.

So, before I left the house, I put the 45mm f/1.8 lens on the camera. I did not even have a lens hood – they are not in stock anywhere right now. I did have a B+W UV Haze filter on the lens. Even so, I knew that I was going to have to be careful about the direction that I pointed the lens, with respect to the angle to the sun, to prevent unwanted lens flare.

In the 3 short evenings that I had practiced with the camera in the house, I had left it in the default setting of “Auto ISO”. I had also read several reviewers on the internet say that the high ISO sensitivity of this camera was good at least all the way up to 6400, so I set that as the upper limit that the camera would use for Auto ISO.  However, when I looked at those practice photos on my computer monitor, I was pretty displeased. This new Olympus OM-D E-M5 was a huge improvement over my Canon PowerShot G-12, but it wasn’t perfect, either. I would say that the Olympus at ISO 6400 looked about as speckled as the G-12 does at ISO 1000.

For this walk, I set the ISO to 200 and left it there. If I needed more light, I was going to use the “business end” of the aperture settings that this 45mm f/1.8 lens was capable of – i.e. f/1.8 – and would also allow me to se how well it performed with narrow depth of field situations such as this:

And this:

Normally this 3 mile walk through my hilly neighborhood takes me anywhere between 47 and 49 minutes. Due to my stopping and taking photos of anything that looked interesting to me, on this day it took more than an additional 30 minutes more.

It was mainly overcast early in the walk, but the longer I was out, the more the sun would shine through the clouds. Photos of plants simply do not look good when taken in direct sunlight. As a result, I past by many interesting photo opportunities while the sun was out, and had to move quickly to capture what I could when the sun  was behind a cloud.

This next photo was taken while the sun was out, but it was on the shady side of the Magnolia tree. On my first shot of this blossom, it was pretty well underexposed. Camera meters get fooled by scenes that vary significantly from an average brightness. The white petals on this blossom were supposed to be white, and not gray, so I simply set the Exposure Compensation to +1.0 and took this photo.

Now I had to turn and walk up my longest (not my steepest) hill. Along the way, I noticed how well the yards were looking, as compared to this time last year, when Austin was in a terrible drought.

At the top of the hill, the sun went behind some heavy clouds, but I still had plenty of light to shoot with. The next shot with the two cacti was taken with a shutter speed of 1/2000 of a second. The aperture wasn’t wide open, but even at f/3.2 – and on a Micro Four-Thirds camera – it did a very nice job of blurring the cactus in the background.

So I was just walking along shooting when the clouds were helping me out.

There is a style of photography known as “Street Shooting” where the photographer is simply out on the street, taking photos of interesting architectural features of buildings, and usually more important than that, they are attempting to photograph people candidly, in their daily life – and with their natural facial expressions (not a posed, fake smile).

There are some really good photographers who do this and are also “bloggers on the internet”. Robin Wong and Kirk Tuck are two of the 3 blogs that I read on a regular basis.

I learn a lot from reading what they, and Libby over at Ohno Studios put in their blogs. I like them, because they aren’t trying to sell me something. (OK, Kirk occasionally reminds his readers about the books that he’s authored.)

Now between those three “internet photographers”, I’ve never once see any of them come close to mentioning the type of “Street Shooting” that I was really enjoying on this Saturday morning.  I suppose I still have a lot to learn….

At the base of my steepest 1-block-long hill, I stopped to photograph a few things in this yard before I tackled the hill.

The sun was out most of the time now, but when I saw some movement in my peripheral vision, something instinctively made me raise my camera and get off this one shot just as the doe jumped into a full sprint.

OK, about another block beyond the deer siting, is my second steepest hill, but the good news it is just a few hundred yards from our home.

I could easily tell when the sun was out by observing my own shadow on the sidewalk.

I’m not sure if that qualifies as Street Shooting… it was actually a driveway!

There were only a couple more photo opportunities at the top of the hill.


I’m almost home now. This the intersection that you turn into Bing Cherry Lane, which is the cul-de-sac that I live on. Our house is to the left of the house on the left in this photo.

Before I end my walk, I have to go to the end of the cul-de-sac and then come back to the house.

The Purple Sage looks great this year, and this was the only time I passed them when the sun wasn’t out.

I don’t think this one is a Purple Sage, but the sun wasn’t blasting it with hard light, so I took this photo.

Before I ended my walk, I wanted to make sure that I had at least one shot where the aperture was wide open at f/1.8 so that I could see how what kind of “bokeh” that this lens would produce on the Micro Four-Thirds sensor in this new Olympus OM-D E-M5.

I was pleased to see that I could achieve this sort of effect – one that I really enjoy producing with my full-frame Canon 5D Mk II.

Well, here’s where my journey ends.

I didn’t get the “exercise benefit” that I always get from this 3 mile walk. Even so, I was very excited when I was done – mainly because I was pretty confident that I could take this new camera on our vacation and still not wish that I had brought my “real camera” with me.

At ISO 200, the images look great to me. I had the camera set to capture both JPG and RAW simultaneously – mainly because Adobe had not officially released the updates to Lightroom 4.1 and Camera Raw 7.1 that I would need to process the RAW files with.

While on vacation in Ruidoso, New Mexico, Adobe did release those updates, and I spent the morning of May 31st going through these photos and putting this post together. In ALL of the photos in this post, the White Balance was left at “As Shot” (the camera was on Auto White Balance). The Exposure, Contrast, Highlights, Shadows, Whites, and Blacks sliders were all left at 0 (zero). ALL of the photo did have the Clarity slider set to +20, the Vibrance slider set to +8, and the Saturation slider set to 0 (zero).

Why the bump in Clarity and Vibrance? Because that’s just the way I post process all of my RAW files, except for portraits of women (where I leave the Clarity slider at 0 (zero) – and then use the Adjustment Brush to reduce the Clarity on just their facial skin to -50).

When I exported the JPG photos that you see here from Lightroom 4.1 they were reduced in size to 1000 pixels along the long edge, which is quite a bit less than the 4608 pixels that the camera captured. This inevitably results in a loss of resolution. Even so, I think you will agree with me that what you see here isn’t too shabby!

My next few posts will be to show some of the photos that I took this week – all of which were taken with my new Olympus OM-D E-M5 camera and the three lenses that I currently have.

CowParade Austin Calendar – June – Cowmaro

June is a hot month in Austin. The Chevy Camaro has always been a hot car in my book. Therefore, it seemed fitting to put the cow named Cowmaro into my CowParade Austin 2012 Calendar in one of the hot summer months.

The artist who did Cowmaro is Dale Whistler, and you can visit his web site to see many examples of his art – many of which are virtually iconic to those of us who live here in Austin.  You can watch a short YouTube video of Dale, where he is interviewed about his past and some of his objects of art.

Dale was sponsored by the Central Texas Chevy Dealers to make Cowmaro.

Cowmaro was on display out on the front “lawn” at the Bob Bullock Texas State History Museum, with 3 other cows. I say “lawn”, because when we arrived at the Bob Bullock museum on August 20th, central Texas was still very much in the clutches of the hottest summer ever on record here in Austin. The drought was severe, and water rationing was being practiced by everyone in the Austin area.

We arrived a little before 11:30 AM, and it was already blazing hot. There wasn’t a cloud in the sky. This is just about the worst possible condition to photograph anything outdoors – especially an art object. The ONLY thing that I could do was to put a polarizer on my lens and pray. Even so, you can tell by the shadow at the top of this photo just how hard the direct sunlight was….

Helpful Hint: You can always view any photo at a larger size by just clicking on it. You will then need to use your browser’s “Back Button” to return to my story.

The left side of Cowmaro had the image of the front of a Chevy Camaro painted on it, while the right side of Cowmaro had the view of the rear of the car on it. It was as if the car was somehow stuck inside of the cow!

Now I personally never owned a Chevy Camaro, but I always liked the look of one – they usually stop me in my tracks and I have no choice but to stare and wonder what fun it must be to drive one! Later on, (much later on – 1996), I owned a 1994 Chevy Corvette. It was the most trouble-free car that I have ever owned, and I’ve had lots of Toyotas and Hondas. I had that Corvette for nearly 3 years, and only put 11,000 miles on it…. although I would occassionally drive it hard, most if the time I babied it.

If you don’t remember the Chevy Camaro, here is one that I took a photo of in October 2010 at the Rolling Sculpture Car Show in Bee Cave, TX. I would guess that this is a 1968 Camaro SS.

You can see my favorite 100 cars at that show my going to my “Photo Gallery” button under the banner at the top of this page, and selecting the sub-menu for that car show.

OK, let’s get back to Cowmaro! I moved around to the opposite side, and of course, it was the shady side of the cow. To prevent my photograph from ending up as a silhouette, I put an external flash (Canon 580EX II) on top of my camera (Canon 5D Mark II), set it for TTL mode, with a flash compensation of -1 stop, and fired off these next two photos.

This is not particularly “artistic” photography, but not too shabby of a “journalistic” type of photography. But hey, that’s all we were trying to do anyway.

As an attempt to do something “artsy” while we were there, I composed this photo of Cowmaro on the burnt-up lawn, positioned over the cow named Mazy Moo that was done by Susi Alcantara.

(You  can see all 72 of the CowParade Austin cows by clicking on the  “Photo Gallery” button and choosing the CowParade sub-menu.)

As it turned out, we needed to return to the Bob Bullock Museum on Sept.17, as they had added a new cow (Once in a Blue Moo by Lewis Signs), and we needed to photograph it. This time, the lighting was much better, as it was a very hazy, overcast day. Still no rain to help the drought situation, but the overcast sky helped keep the temperature down below 100 degrees, and it was MUCH better light to be photographing painted cows with!

Even though it was almost exactly the same time of day as our previous visit (this time it was 11:13 AM), I did not need to use a Fill Flash on the “shady side” of the cow.

And finally, here is the shot that I liked the best, and so this is the one that I ended up putting on my CowParade Austin 2012 Calendar, for the month of June.

The overcast sky even made the shiny metal plaque look better!

Tour of Moncrief-Neuhaus Athletic Center

Warning: this post is very long and contains 34 photographs. It might take a while to download.

Last Tuesday, on May 8th, I was presented with a very rare opportunity to tag along with a group of retired people that my wife, Barb, spends time with most Mondays at the University of Texas campus. The group is known as the UT SAGE, where SAGE is an acronym for Seminars for Adult Growth and Enrichment. Anyway, this group was taking members who wanted to go on a “South End Zone Tour” at Darrell K. Royal Memorial Stadium.

That’s the football stadium for The University of Texas Longhorns! More specifically, the tour was mainly of the Moncrief-Neuhaus Athletic Center, which is where the vast majority of all UT athletes work out, but we were there to see the football player’s facilities.  Now I’ve been in Austin for 40 years this August, and I am a University of Texas graduate, and I have never had the opportunity to see anything “more inside” the football facilities other than buying tickets and attending the home games. When Barb said she was allowed to bring a guest, I immediately said “yes!” and scheduled a day of vacation at work.

Helpful Hint: You can always view any photo at a larger size by just clicking on it. You will then need to use your browser’s “Back Button” to return to Gregg’s story.

It was raining most of the day, and when we got there at 3:30 PM for the tour, we still had to use our umbrellas. We met at the entrance to the Moncrief-Neuhaus Athletic Complex, which is at the southeast corner of the stadium. That corner is somewhat open, and as we approached the front door to the facility, we could see inside the stadium somewhat.

Now the photos that I am going to show you are not skilled photography. They are “get the shot and move along with the tour” kind of shots. I was simply trying to document what we were being shown, so I could share it here with you. This was just like being a tourist in my own town.

By the way, I had ordered a new Olympus OM-D E-M5 camera from Precision Camera on May 1st, hoping that I would have it with me for this tour, but it just wasn’t meant to be. Instead, I was going to have to use my Canon PowerShot G12, which is a Point-and-Shoot type of a camera. I knew that if I showed up with my Canon 5D Mark II that there was a very good chance that I would not be allowed to bring it inside the facility (and heaven forbid I even think about a tripod).

I did bring a Canon 580EX II flash with me, but I had Barb put it in her large purse, and I never used it. Instead, I handheld the G12, and shot under all sorts of different lighting conditions. This is the sign on the wall over the front desk, where we gathered to wait for the tour to start. There were tungsten lights aimed down the wall, while there was a mixture of tungsten and fluorescent overhead lights in the ceiling.

This is just beyond the front desk. Here are the 20 or so exhibits, one for each of the most famous players ever to play for the Longhorns.

After spending 5 minutes in that front hallway, we were taken into the Player’s Lounge.

Silhouetted beyond the pool table is our tour guide, Curt. Curt encouraged us to take pictures, and I immediately “got mobile” and started shooting everything that I could!  He watched me at times, but never said anything to me. I thought that he eventually would, as I was taking 5 to 10 times more photos than anyone else in the group.

There were 3 or 4 of these saddles in the Player’s Lounge. I wondered if they were just for decoration, or if the players actually climbed onboard when they got rowdy.

On the other side of the pool table, there is this giant wall that contains helmets of all 28 NFL teams (plus the former Houston Oilers). Under each helmet is a small plaque for each Texas Longhorn player actively playing on that NFL team.  Wow!

We then moved from the Player’s Lounge a few doors down to The Trophy Room. This is my wife, Barb, standing next to the 2005 National Championship trophy. This was very special to me, as my good friend Greg Ringer and I went to that National Championship game at the Rose Bowl on January 4, 2006.

Here is a photo that I took with my 4 megapixel Olympus C-770 Ultra Zoom camera that I took to the game. This was taken from our seat, about 5 rows above the tuba players in the Longhorn Band. Yes, the Texas quarterback, #10, is Vince Young.

Anyway, I just had to have my photo taken next to this trophy. I probably should have traded places with Barb, but I wasn’t looking at the back of the camera, so I didn’t see the huge perspective distortion of having the larger person closer to the wide-angle view camera.

Simply turning around 180 degrees from the previous camera position shows this view.

This is Ricky William’s Heisman Trophy that signified he was voted “the best college football player of the year” in 1998.

And here is Earl Campbell’s Heisman Trophy from 1977.

After leaving the Trophy Room, we were taken down further into the facility. Along the way, we passed by “The Longhorns” that each player touches as they leave the facility right before heading out onto the field before each game. There is a camera on them as they do this, and it is displayed on the HUGE video scoreboard outside for all 100,000 fans to see. They always cheer wildly when they see this!

Here are some of the trophies from the Longhorn’s major bowl victories. The first 4 pedestals closest to you are from the Cotton Bowl (in Dallas, TX). The next one is the Holiday Bowl (in San Diego, CA). The next one is from the Rose Bowl (Pasadena, CA – and the game that Greg and I went to).The next one is for the Fiesta Bowl, and the last one is too blurry for me to read now. 🙂

Those Bowl Trophies are at one end of a very long hallway outside the weight training room, and that hallway is just loaded with hundred of plaques and memorabilia of famous players and historically significant victories. Here’s a photo that I put the camera into macro mode, and held it right up to the glass, just 8 to 10 inches from this football.

We then went into the weight training room. Holy Cow!

There were maybe 20 or so athletes and coaches working out while we were in there, but I was very careful to not make them the main subject of these photos.

After the weight room, we were told that we were going to be taken trough the same rooms and route that the players go through immediately before a game.

This is the large auditorium that the players meet in, while the coaches and inspirational speakers get them all pumped up. Our tour guide, Curt, is standing where Mack Brown would be standing. I was sitting in the 4th row, trying my best to keep my camera steady. I had to bump up the ISO to 500, and even then the shutter was 1/5 of a second (f/5.0). My elbows were firmly planted on the arm rests!

While remaining in my seat, and turning to my right, this is what I saw.

Turning to my left, this is what is on the wall.

After leaving the auditorium, we deviated from the plan to follow the route that the players take, and we went down a few doors to spend a few minutes in the medical facilities. This is where they bring the injured players during a game. This is also where all the injured athletes from The University come for physical rehabilitation.

OK, now we are back on the plan to follow the route between the auditorium and the field. This is very much a “grab on the go” type of shot, with Barb blinking while I snapped the shutter of her touching “The Longhorns”. We were moving fast, in a large group, and with a one shot opportunity, sometimes a shot like this is what you end up with….

OK, so they didn’t fill the tunnel with smoke for us, like they do for the players when they run out onto the field. It was lightly raining, but there was no way I was going to miss this once in a lifetime opportunity!

In the next photo, you can almost see our season ticket seats in the upper deck high on the left side of the photo. We are about 6 rows above the white colored seats, in the upper deck, right at the edge of the photo.

After walking out past the 20 yard line, I turned around and took a picture of the large video scoreboard above the tunnel that we had just came out of. You can see the raindrops streaking down in front of the black scoreboard.

After spending 3 or 4 short minutes at mid-field listening to Curt’s stories, the group headed back for the dryness of the tunnel. I called out to Barb to come back so that I could get this photo of her.

The group stood in the tunnel for a long time, and I took several photos looking out of it.

We then walked under the coverings to the southwest corner of the stadium to see the two 8 foot tall statues of the school’s only 2 Heisman Trophy winners. This one of Ricky Williams has only been in place a few months.

And this one of Earl Campbell has been here for a while now (5 years?).

I know that this post was very, very long. I seriously considered chopping it up into multiple posts, but in the end I thought that would not have the storytelling effect that I wanted it to have.

The Canon PowerShot G12 did a pretty good job, as I had about 50% of the photos that I actually took ended up in this post. Viewed up close, there is a fair amount of grain when I pushed the ISO to 400 and even 500. The camera did a pretty good job with Auto White Balance, but I did shoot these in RAW format, and did adjust the color temperature of several of them in Lightroom. The Image Stabilization of this little camera surprised me with how well it performed!

I hope that you enjoyed seeing this as much as I enjoyed being able to tag along with this tour.

CowParade Austin Calendar – April – CowBella

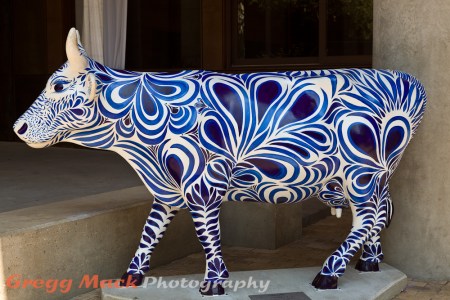
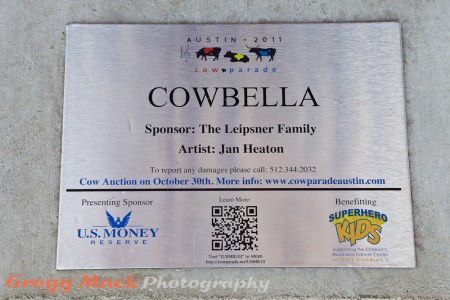
The “April Cow” in my 2012 calendar is the gracefully beautiful CowBella. The artist who painted CowBella is Jan Heaton, and she was sponsored by The Leipsner Family.  CowBella was on display at West 2nd Street & Lavaca Street – at The W Hotel here in Austin.  You will definitely want to read this post to the end, as I asked the artist Jan Heaton if she would like to participate in this post!

The morning of Sept. 03, 2011 was very busy for Dad and I as we photographed most of the CowParade Austin cows in the center of downtown Austin within 4 hours. The EXIF metadata embedded in the photos reveals that my first photo of CowBella was taken at 10:52 AM, and the last one was taken just 5 minutes later at 10:57 AM. By that time the sun had risen pretty high in the still-summer sky.

Fortunately, CowBella was located on the south side of a wide support column at The W Hotel, so she was still completely in the shade. That was the good news. What wasn’t very good (for the photographer) was that the bright sunlit sidewalk was getting very close to CowBella, and I would only be able to photograph one side of this beautiful cow.

(Helpful Hint:  You can always view any photo at a larger size by just clicking on it. You will then need to use your browser’s “Back Button” to return to Gregg’s story.)

You can see the bright sunlight washing out a step in the sidewalk in the lower left corner of this photo. I suppose I could have done something in Photoshop to eliminate that, but I wasn’t planning on submitting this photo to any contest or anything….

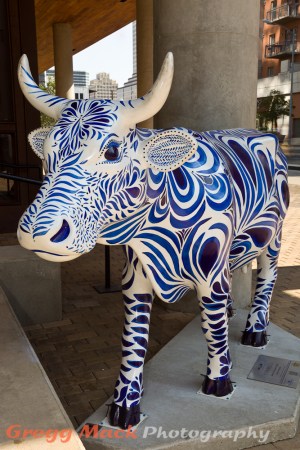
After taking the “broadside” photo above, I moved a bit to my left and to where I could see some of the front of CowBella’s face.

Now you can see the bright sunlight both in front and behind the cow. I did use the Adjustment Brush in Lightroom to bring the exposure down in both of those areas by 2/3 of a stop. This is the photo that Barb and I chose for the “April Cow” in the calendar.

OK, so I moved a little further to my left to get a “front shot” of CowBella. I really like the way that Jan painted the eyes on CowBella.  It looks like she’s looking at me looking at her!

The “tricky” part of making this photo was getting the tremendous amount of depth-of-field. Everything from CowBella’s nose, all the way back to the buildings over her head are in focus. That requires a small aperture opening (high f/stop number) and a wide angle lens. For this photo, I used an aperture of f/20 and a focal length of 45mm (on a full-frame sensor camera).

Now I had 3 areas of the photo with bright sunlight to deal with: in front of CowBella in the lower left corner, directly above her head, and the sidewalk and building behind her. Once again I used the Adjustment Brush in Lightroom to reduce the Exposure in 2 of these 3 areas: -0.4 stops in the lower left corner, and -0.43 stops in the sky directly above her head. (I did not need to touch the buildings above her head, because the sides of those buildings were also in the shade.) I also got that splash of sunlight on the circular column right above where CowBella’s right horn meets her head.

I really liked the way that CowBella was “looking at me”, and so this photo was paired up with another cow that was “looking at me” on the front cover of the calendar. That other cow is Mooquet, who was painted by Terrell Powell, and was sponsored by Breed & Co. (That is the only photo of Mooquet in the entire calendar.)

Now I have never met Jan Heaton, but we do have a mutual good friend, Barb Huffman. When I first took my photos of CowBella, I had Barb forward them to Jan. She responded that she liked them (she was just being polite). After we had the 2012 calendars printed, we gave one to Barb Huffman, and asked her to give another one to Jan Heaton when she got a chance. As a result, I again heard from Jan that she liked it (again she was being polite!). Since I now had Jan’s email address, I asked her if she would like to contribute anything to my “Cow of the Month” post – since it was her cow!

Jan very quickly responded, and here is what she graciously provided for you:

Hi Gregg:
Happy to participate. Here is my press info on CowBella!

About CowBella
One year ago, professional artist Jan Heaton visited Umbria, Italy.
The region’s spectacular art inspired her to create a series of watercolor paintings titled Tranquillo.
Translating the serenity of the paintings to a three dimensional cow seemed like a natural fit.
CowBella’s design is inspired by the intricate indigo hued ceramics of Deruta, Italy.
Her design was painted entirely with watercolor brushes, and varied transparent color glazes of one blue pigment color only.
In the process of designing and painting CowBella the artist became quite attached to this sweet heifer.

CowBella’s Measurements
Height (including horns): 57”
Neck: 42”
Waist: a petite 83”
Length: (nose to tail): 95”
Hoof Size: a dainty 5”
Weight: 100 #
BMI:19.6 (No added growth hormones.)

About Jan Heaton
Jan’s paintings offer a personal viewpoint that celebrates nature, and then abstractly reaches beyond the obvious.
Heaton’s watercolors are inspired by the structure, color, line and pattern of elements in nature that are often overlooked.
Her work isolates details and exposes the viewer to an everyday object or place seen from a new perspective.
She incorporates her background in calligraphy and graphic design to create sensuous organic forms.
Jan is a faculty member of the Austin Museum of Art School, and a Signature Member of the National Watercolor Society.
Jan’s artwork is represented by art dealers in Austin, Atlanta, Chicago, Los Angeles, San Francisco, Laguna Beach,
London, and San Miguel, Mexico. In Austin Heaton’s artwork is represented at Wally Workman Gallery.
Additional info on the artist can be found on her website, www.janheaton.com.

So there you have “the complete story” on CowBella. Be sure to visit Jan’s web site and check out her remarkable works of art!

Austin Sunset Sequence

The photo above was taken on 2/3/2009 at 6:43:57 PM.

Here’s the sequence of photos that were taken before and after that photo. I had my tripod set up right next to the Stevie Ray Vaughan statue, and the camera was pointed towards the northeast. These photos were taken with a camera that I no longer have; my trusty old Canon 5D. For all of these photos, the ISO was set to 100, the aperture stayed at f/11, and only the shutter times were varied. Focal length of the 24-105mm zoom lens was set at 40mm.

The official sunset in Austin that particular day was 6:10 PM.

2/3/2009, 5:37:19 PM

2/3/2009, 5:53:47 PM

2/3/2009, 5:59:47 PM

2/3/2009, 6:08:52 PM

Official Sunset is 6:10 PM

2/3/2009, 6:17:13 PM

2/3/2009, 6:23:04 PM

2/3/2009, 6:30:12 PM

2/3/2009, 6:37:27 PM

2/3/2009, 6:42:58 PM

2/3/2009, 6:49:20 PM

2/3/2009, 6:55:17 PM

2/3/2009, 6:59:24 PM

Good night, and I hope you enjoyed the show.  I hope that you will click on the “Leave a Reply” link below and let me know if you like this type of post. Thanks!